

What Is Secure Boot?
Secure Boot is a crucial UEFI firmware feature for Windows 10 and Windows 11 that ensures only trusted, signed software is loaded during the boot process. When you enable Secure Boot, it protects your PC from rootkits, boot-time malware, and unauthorized operating systems—a requirement for advanced security and to play some modern games like Battlefield 6, that using EA Anti-cheat software.
Step 1: Check If Secure Boot Is Enabled on Your PC
A. Using System Information
-
Press the Windows Key + R to open Run.
-
Type
msinfo32and press Enter or click OK.

-
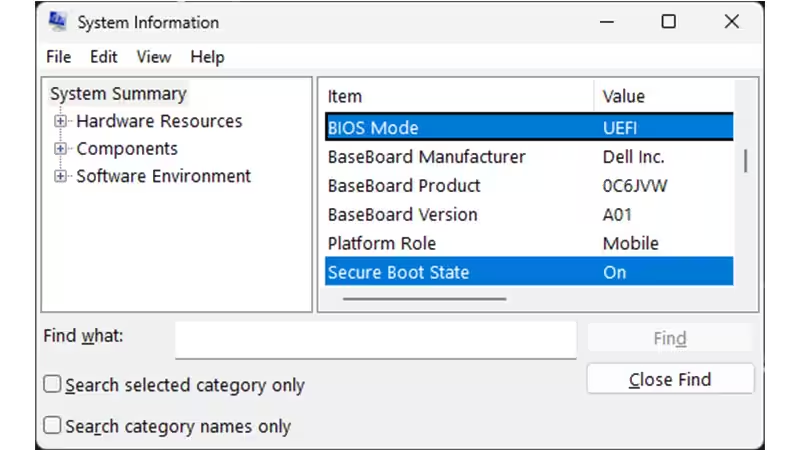
In the System Information window, look for:
-
BIOS Mode: Should be
UEFI -
Secure Boot State: Should be
On
-
-
If Secure Boot State is “Off,” proceed to enable it. If it says “Unsupported,” check your motherboard specifications.
B. Via Windows Settings
-
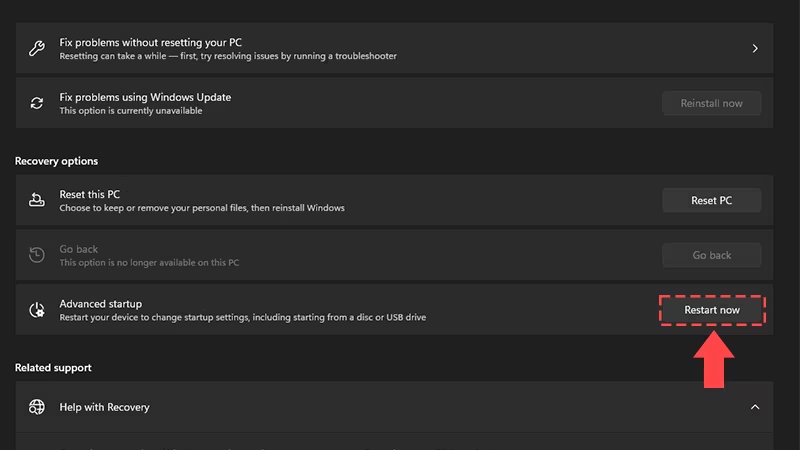
Go to Settings > Update & Security > Recovery
-
Under “Advanced startup,” click Restart now
-
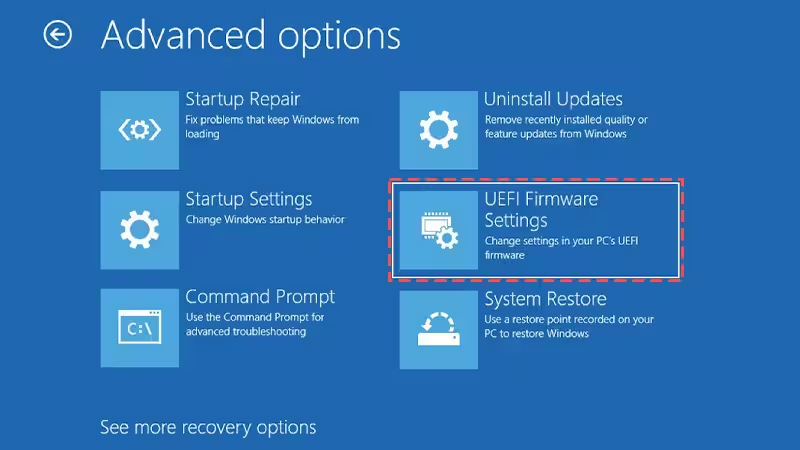
Choose Troubleshoot > Advanced options > UEFI Firmware Settings to access the BIOS
Step 2: Prerequisites for Enabling Secure Boot
1. UEFI Firmware Mode
-
Secure Boot requires your PC to use UEFI, not legacy BIOS.
-
Check System Information as above; “BIOS Mode” should be UEFI.
-
If your system is in legacy (CSM/MBR), you’ll need to convert your Windows disk to GPT and switch BIOS to UEFI.
2. TPM 2.0 Must Be Enabled
How to check if TPM 2.0 is enabled:
-
Press Windows Key + R, type
tpm.msc, press Enter or click OK.
-
In the TPM Management Console, check “Specification Version” under TPM Manufacturer Information—it should read 2.0.

-
If it’s not enabled, refer to your motherboard’s support documentation on how to enable TPM in the BIOS.
3. Disk Partition Style Must Be GPT
-
Press Windows Key + X then select Disk Management.
-
Right-click your system disk (usually C:), select Properties > Volumes tab.

-
“Partition Style” should read GUID Partition Table (GPT).
-
If it says MBR, you must convert it:
How to convert MBR to GPT without data loss:
-
Open Command Prompt as Administrator.

-
Validate:
textmbr2gpt /validate /disk:0 /allowFullOS
-
Convert:
textmbr2gpt /convert /disk:0 /allowFullOS
(Replace 0 with your system disk number as needed)
Back up your important data before proceeding. Converting disks can introduce startup issues if not performed correctly.

Step 3: How to Enable Secure Boot in Your BIOS
Note: BIOS menus differ by manufacturer. These steps are generally applicable to most modern PCs and laptops:
1. Restart and Enter BIOS/UEFI
-
Restart your PC and immediately begin pressing the key to enter setup (commonly F2, Delete, ESC, or as specified by your manufacturer).

2. Locate Secure Boot Setting
-
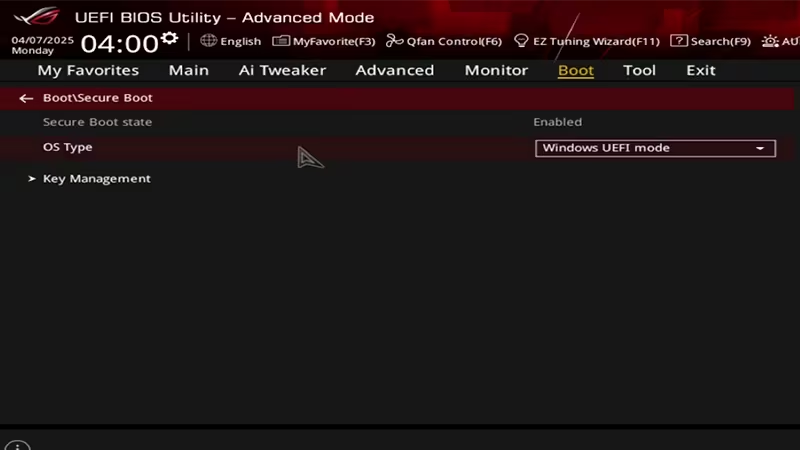
In BIOS, go to the Boot or Security tab.
-
Look for a Secure Boot or Secure Boot Control setting.
3. Enable Secure Boot
-
Set Secure Boot to Enabled.
-
If required, set “OS Type” to “Windows UEFI mode.”
-
On some systems, you may need to “Install Default Secure Boot Keys” under “Key Management.”
-
Save your changes and exit (usually via F10).
4. Reboot and Validate
-
Boot into Windows.
-
Re-run msinfo32 to confirm “Secure Boot State” now reads On.
Step 4: Troubleshooting Secure Boot
-
Can’t change Secure Boot setting?
-
Some vendors require Secure Boot keys to be reset to Factory Defaults or an admin BIOS password.
-
-
Option is “grayed out” or missing?
-
Switch your boot mode from Legacy to UEFI. Convert your disk to GPT if needed.
-
-
TPM errors or “unsupported”?
-
Update your BIOS. Try enabling “Intel Platform Trust Technology” or “AMD fTPM” if on an AMD CPU.
-
-
After converting MBR to GPT, won’t boot?
-
Make sure UEFI mode is enabled after conversion, and “Launch CSM” is disabled.
-
Manufacturer-Specific Secure Boot Guides
For detailed instructions branded to your laptop or motherboard, consult your manufacturer resources:
| Brand | Secure Boot Guide | TPM 2.0 Guide | UEFI BIOS Guide |
|---|---|---|---|
| Acer | Support | Secure Boot | UEFI BIOS |
| Dell | Secure Boot | TPM 2.0 | UEFI BIOS |
| ASUS | Secure Boot | TPM 2.0 | UEFI BIOS |
| HP | Secure Boot | TPM 2.0 | UEFI BIOS |
| Lenovo | Secure Boot | TPM 2.0 | UEFI BIOS |
| MSI | Secure Boot | TPM 2.0 | UEFI BIOS |
Frequently Asked Questions (FAQ)
Q: Why isn’t Secure Boot showing up?
A: You must be in UEFI mode and have a GPT disk. On older systems, update your BIOS and ensure UEFI boot is enabled.
Q: Does enabling Secure Boot delete my files?
A: No, but converting from MBR to GPT or switching firmware modes is risky. Back up important files first.
Q: Is TPM 2.0 required for Secure Boot?
A: Newer motherboards require TPM 2.0 for Windows 11, which works in tandem with Secure Boot for advanced security.
References & Resources
With these steps, your PC will be ready to use Secure Boot—protecting your data and ensuring compatibility with the latest Windows features and security requirements. Always refer to brand-specific documentation when in doubt, and back up your important data before making major changes to disk or firmware settings.
Related Posts
-
- Xbox Free Play Days: WWE 2K25, Dynasty Warriors: Origins, I, Robot, and The Ascent Light Up This Weekend
- Every Fresh New Game Coming Next Week on Xbox Series X|S and Game Pass (August 4–8, 2025)—including Mafia: The Old Country, Gradius Origins, and Demon Slayer: Hinokami Chronicles 2
- How to Generate Text and Images with Microsoft Copilot in Windows 11 Like A Pro: The Ultimate Guide
- Raven Software Workers Ratify First Union Contract at Microsoft, Set New Standards for Video Game Industry
- 4 keyboard shortcuts to take a screenshot fast and easy on Windows 11
Discover more from Microsoft News Now
Subscribe to get the latest posts sent to your email.
