

Windows 11 introduces a feature known as “active hours,” which is designed to enhance the user experience by minimizing disruptions due to system updates. This guide provides a comprehensive walkthrough on configuring active hours to ensure that Windows 11 updates (that happen on days such as Patch Tuesday) do not interfere with your productivity.
Checking your active hours in Windows 11
Before configuring active hours, it’s useful to check their current status:
1. Via Settings
- Open Settings (Windows key + I keyboard shortcut) from the Start menu.
- Go to Windows Update > Advanced options.
- Locate the Active hours setting to see if it’s set to Automatically or Manually.

- If set to Manually, then you can see the specific start and end times (up to 18 hours) for what time period you want active hours to be activated in Windows 11.


2. Via Group Policy (for Windows 11 Pro, Enterprise, and Education editions)
- Use the Windows key + R keyboard shortcut, type
gpedit.msc, and press OK to open the Local Group Policy Editor. You can also open it by simply searching for it from the Start menu.

- Follow this path u: Computer Configuration > Administrative Templates > Windows Components > Windows Update > Manage end user experience.
- Double-click the Turn off auto-restart for updates during active hours policy to check its configuration.


3. Via Registry Editor (for advanced users only)
- Use the Windows key + R keyboard shortcut, then type
regedit, and click OK to open the Registry Editor. Click Yes when prompted by the User Account Control prompt. - Navigate to the following path:
HKEY_LOCAL_MACHINE\SOFTWARE\Policies\Microsoft\Windows\WindowsUpdate. - Check for the presence of ActiveHoursStart, ActiveHoursEnd, SetActiveHours values to determine if active hours in Windows 11 are configured.


Manually configure active hours in Windows 11
1. Via Settings
To manually set active hours in Windows 11:
- Go to Settings > Windows Update > Advanced options.
- Click on Active hours.
- Choose the Manually option from the dropdown menu.
- Set the Start time and End time (max 18 hours) for your active period.


By setting these parameters, Windows 11 will avoid rebooting for updates during your specified active hours.
2. Via Group Policy
For users with access to Group Policy (Windows 11 Pro, Enterprise, and Education editions):
- Open the Local Group Policy Editor (gpedit.msc) by searching for it from the Start menu.
- Navigate to the following path: Computer Configuration > Administrative Templates > Windows Update > Manage end user experience.
- Double-click the Turn off auto-restart for updates during active hours policy.
- If not configured, change the status to Enabled, and then you can set the (Start and End) Active Hours in Windows 11. When finished making changes, click Apply, and then click OK.


This method ensures that updates respect your specified active hours and prevents users from modifying these settings without changing the policy.
Rescheduling automatic restarts
To schedule a restart after an update:
- Open Settings and go to Windows Update.
- Click the arrow next to Restart now and select Schedule restart.
- Choose a convenient time for the restart.
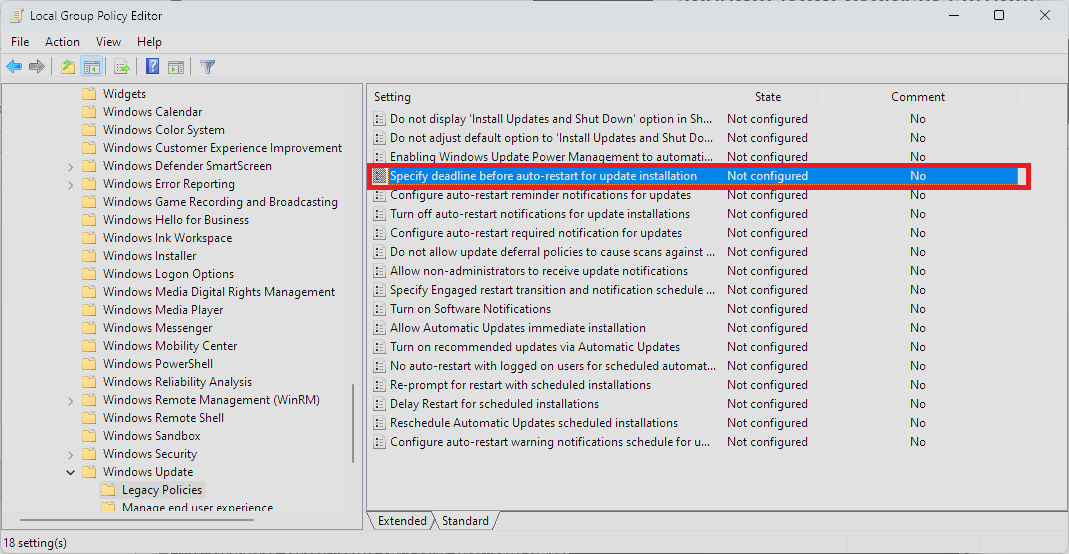
Setting automatic restart deadlines
To enforce update installations within a specific timeframe using Group Policy:
- Open the Local Group Policy Editor by searching for
gpedit.mscfrom the Start menu. - Navigate to the following path: Computer Configuration > Administrative Templates > Windows Components > Windows Update > Legacy Policies.
- Double-click Specify deadline before auto-restart for update installation.

- Select Enabled and set the desired deadline days for automatic restarts. Then click Apply and then OK for the changes to take effect. This ensures devices stay updated by restarting after the deadline, enhancing security and compliance.
By mastering the configuration of Active Hours in Windows 11, you can ensure that system updates occur at times that are convenient for you, whether you’re an individual user or managing multiple devices in an organization. This feature not only enhances productivity but also contributes to maintaining system security.
Discover more from Microsoft News Now
Subscribe to get the latest posts sent to your email.
